One of the most powerful Logic softsynths is Sculpture. Most Sculpture patches have been created using keyboards, but it is fairly simple to modify many patches into wind-synth patches.
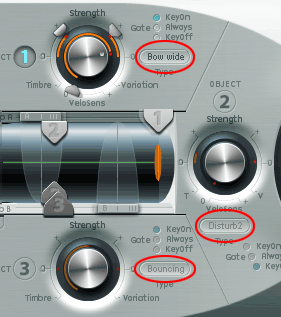
1. The first order of business is to choose the patch to convert. Patches that are percussive or plucked are not going to work really well on any wind synth. If you modify them enough to work, the character of the final patch will be quite different than what you started with. Here is the part of Sculpture where you choose the object type:

The object types are circled in red. For best wind-synth compatibility, set these to Blow, Bow, Bow Wide, Noise or Impulse. All of these work better with a gradual note onset. This patch only has Object 1 activated, so we only have to worry about that. Other patches may have more active objects.
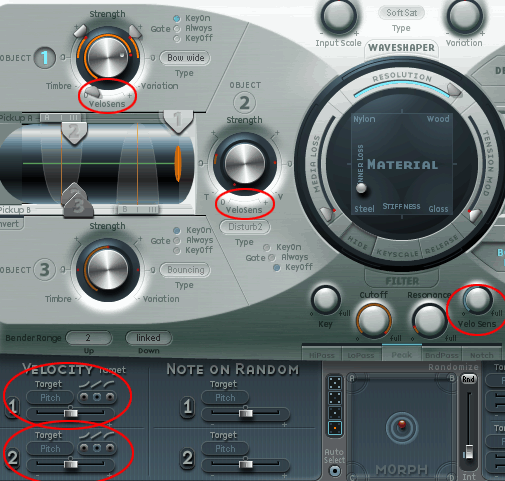
2. Next, get rid of any velocity-sensitive characteristics. Wind synths just don’t do velocity and the velocity options will prevent full control of the sound with breath. Here are the parts of the Sculpture interface that are velocity-related:
The simplest approach is to turn these all down to 0. However, this will also change the character of the sound, so you might want to map the velocity characteristics to another controller. I use a MIDI Solutions Event Processor to do this when required, but you can get creative with some other controllers on your wind synths or a foot pedal. For this patch, there are no active velocity characteristics, so no worries.
3. Next we set the MIDI controllers at the bottom of the Sculpture screen:
At the far right, change the default Mode to “Load from Setting”. The other settings reflect my preferred controller setup: in addition to the controllers on the wind synth, I use 2 foot pedals. One is on 4, the standard foot pedal number. The other is on 30 and controls only the vibrato. At the very least, you will want to set Ctrl A to “2 Breath”.
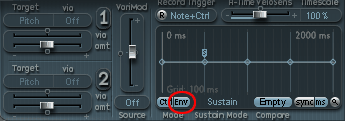
4. If the patch had an envelope programmed in, you probably want to disable it. You usually build the envelope with the breath controller, so if Env is highlighted(lit up in blue), click on it to deselect it.
5. Now you’re ready to actually build the control link to the wind synth. You can do this in two different panels. Each will have a slightly different effect, see which you prefer. First, activate the link by clicking on the big 1 beside it:
6. Next, click and hold under “Target” and select “Object1 Strength” from the dropdown menu:
7. Finally, if you’re using the Controller A panel at left, slide the button all the way to the right. If you’re using the Controller area at right, set Via to Ctrl A and move both sliders to the right:
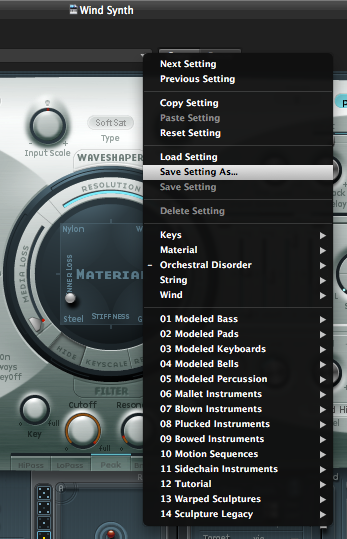
8. Finally, Save As under a different name:
Other tweaks:
– if the patch has 2 or 3 objects, you will have to repeat the above steps for the other objects. You have to get creative if there are 3 objects, because the Controller A link only has 2 slots. For these, I use Envelope 1 on the right side of the screen for Objects 1 and 2 and Envelope 2 for Object 3.
– most wind synths are duophonic at most, so do your CPU a favor and set Voices to 2.
– you may have to reduce the attach and release times to make the sound work better with a wind synth:
This just scratches the surface of revising Sculpture patches for wind synth. This is a deep subject, now go practice!
June 13 2017 edit – I’ve added a downloadable collection of Sculpture presets that have been modified to work with wind controllers. There’s a link on the Downloads page, or just click here: Sculpture Presets for Wind Controllers
Unzip on a Mac, then copy to Users/YourUserName/Library/Application Support/Logic/Plug-in Settings/Sculpture. I recommend making a subfolder with a name like Wind, to make them easier to find in Sculpture. To make the user Library folder visible, hold down the Alt key while clicking on the macOS Go menu and choosing Library.


Leave a Reply